Friday, September 30, 2011

more installation art


Alejandro photographs trash that washes up on Mexico’s shore.

Thursday, September 29, 2011

Demo Day

Today I'll do a demo at 1:10 and another at 1:30 showing how to either graph your painting, or how to use the opaque projector for the self portrait.

As a reminder, here are your painting choices...

Final Acrylic Painting Choice 1: Self portrait with 10 objects that represent you

You will need to bring in a photo of yourself to class asap and using a projector you will trace it onto the paper. The rest of the space will be filled with 10 objects that represent you. Those objects can be anything EXCEPT: numbers, words, hearts, rainbows, crosses or otherwise cliche. Think about the important people in your life, or the important events. How can you represent those things in a way that isn’t predictable?

Focus:
Interesting images carefully drawn
Mixing skin tones
Adding layers to under-painting to create depth and value
Craftsmanship: no pencil lines showing, correct brush choice, no paper showing through
Blending
Creating an interesting composition: using all of the space, and not putting the photo smack dab in the middle.

Final Acrylic Painting Choice 2: Copy a Masterpiece

You will need to find a painting on the computer that you would like to duplicate exactly. After discussing your choice with Mrs. Cannon, you’ll use the grid method to transfer the painting onto your paper and then you’ll replicate each color and brush stroke used.

Focus:
Choosing a painting that has the appropriate level of challenge for you
Drawing the painting with the grid method, exactly
Matching the brush strokes and color
Blending
Adding layers to under-painting to create depth and value
Craftsmanship: no pencil lines showing, correct brush choice, no paper showing through

Specifics:

The finished size will be 22 x 24 unless otherwise discussed with Mrs. Cannon
You will be expected to show your work to the class on critique days. This is point earning.

Inking your pencil lines


As you continue outlining your pencil lines, use this drawing as your inspiration! Lines that are gracefully change from thin to thick are interesting. See how much variety you can find in your lines.

Wednesday, September 28, 2011

Art Installations for Participation Points


These Surrounded Islands were completed in 1983 near Miami Beach. The 11 islands were surrounded with 6.5 million square feet of floating pink woven polypropylene fabric covering the surface of the water and extending out 200 feet) from each island into the bay. The fabric was sewn into 79 patterns to follow the contours of the 11 islands.

For 2 years prior to the installation marine and land crews picked up debris from the eleven islands, putting refuse in bags and carting it away after they had removed some forty tons of varied garbage that included refrigerator doors, tires, kitchen sinks, mattresses and an abandoned boat.

On May 4, 1983, out of a total work force of 430, the unfurling crew began to blossom the pink fabric. Surrounded Islands was tended day and night by 120 monitors in inflatable boats. Surrounded Islands was a work of art underlining the various elements and ways in which the people of Miami live, between land and water.

The outer edge of the floating fabric was attached to a 12 inch diameter octagonal boom, in sections, of the same color as the fabric. The boom was connected to the radial anchor lines which extended from the anchors at the island to the 610 specially made anchors, spaced at 50 foot intervals, 250 feet beyond the perimeter of each island, driven into the limestone at the bottom of the bay. Earth anchors were driven into the land, near the foot of the trees, to secure the inland edge of the fabric, covering the surface of the beach and disappearing under the vegetation. The floating rafts of fabric and booms, varying from 12 to 22 feet in width and from 400 to 600 feet in length were towed through the bay to each island. There were eleven islands, but on two occasions, two islands were surrounded together as one configuration.

As with Christo and Jeanne-Claude's previous art projects, Surrounded Islands was entirely financed by the artists, through the sale of preparatory drawings, collages, and early works. The artists do not accept sponsorship of any kind.

For two weeks, Surrounded Islands, spreading over 7 miles (11.3 kilometers), was seen, approached and enjoyed by the public, from the causeways, the land, the water and the air. The luminous pink color of the shiny fabric was in harmony with the tropical vegetation of the uninhabited verdant islands, the light of the Miami sky and the colors of the shallow waters of Biscayne Bay.


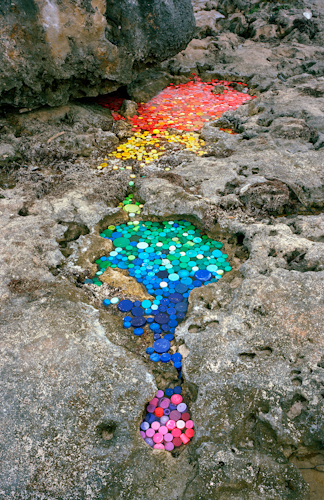
This week several of our students will be creating art installations at Irondale. Our purpose is to draw attention to structures in the building that are not typically seen. Our vehicle will be yarn bombing.

Abstract Time Line


Helen Frankenthaler, Mountains and Sea. 1952. Abstract Expressionism. The painters who came to be called "Abstract Expressionists" shared a similarity of outlook rather than of style-- an outlook characterized by a spirit of revolt and a belief in freedom of expression, and freedom from realism.

For the next week (or so) students will be creating a time line of their lives that will use abstract symbols to represent their 10 most important life events. The finished work will be 2 x 28 inches long and will use ink, colored pencils, glue, collage, paint and anything else we can find around here.

Objectives:
utilizing life experiences as subject matter
communicating in an abstract way

Paper marble and Origami


Students used the suminagashi method for paper marbling and really enjoyed the results. The next day they folded 2 of their many sheets of paper into origami boxes.

Monday, September 19, 2011

Apple Painting


We'll watch this video today. Every time the instructor in the video says to mix the paint with water, substitute slo-dri. We'll talk about that today too.

Underpainting
Building form by adding Layers
Slo-dri

Still Life due this Wednesday!


Last week Art I students compiled a list of how to be successful at this assignment:

No outlines, use the 10 values instead
draw lightly to begin with
Erase often
Measure your objects and how their proportions relate to each other
No smudges
Take your time
Erase around your object if it looks blurry

Just keep rolling, rolling, rolling...


Have you decided that you just love rolling paper? This map idea might be for you.

This week we'll use hot glue to start building up the sides of your bowl. I would say aim for around 100 coils to make an awesome looking bowl. It's easy to use too much hot glue and have a stringy mess. All glue strings can be removed when you're done, but neatness now will save you time later.

Tuesday, September 13, 2011

Teaser...


Here's what we're starting on Monday... Here are the notes that we'll take in class.

Monday, September 12, 2011

Keep on painting your color wheels!


Keep on painting your color wheels! Remember you need to include the hues, tints, shades and complimentary mix of each color.

Make corrections, view finder, and composition


Today let's take the 1st 10 minutes to make any corrections to yesterday's work.

A view-finder is a wonderful tool to use when you're creating art.

It is simply a piece of cardboard with a rectangular opening in it that corresponds roughly to the proportions of your paper.

By focusing the finder on the subject before you, moving it up and down or from left to right, you can select what you think is the most pleasing arrangement.

The margin of the finder blocks off enough of the scene to allow you to concentrate on what you see through the opening.

You will have use for the viewfinder only during the planning of the composition. Compostition is how you arrange the work on your paper. For this drawing, make sure your objects touch the page on at least 2 sides.

Do to: fold your paper in 4. Use your view finder to find an interesting composition and draw a different one for each box. Remember to let the objects touch at least two sides of the paper.

Magazine Bowls

Today we'll start these!

Friday, September 9, 2011

Simple value drawing practice helps you build skillz


Obviously these drawings are very complex. But the artists needed to start somewhere, and that's what we're doing here. Today we'll practice shading a cone, a cylinder, a cube and a sphere.

Today, we're drawing this...

Thursday, September 8, 2011

Notes for your color wheel


Color Vocabulary:

Primary
Secondary
Tertiary
Complimentary
Shade
Tint
Hue

Reminders: 1. Don't mix water with your paint, only use it to wash your brush 2. Mix your colors on a palette. Not on the surface where you're painting. Remember, when you begin something, you learn the rules. After you know the rules you can decide which ones to break!

More about mandalas!

Shaded Ball to go with your Shade Scale

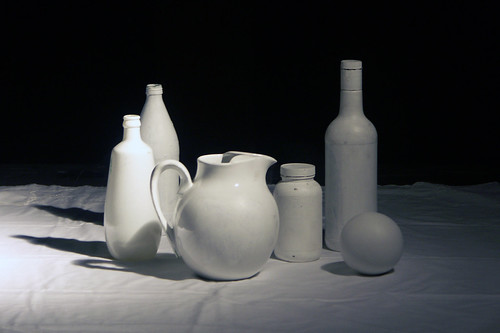
Today we will be working on shading a simple form like a sphere. Without shading, forms often look flat and lifeless. Once you start playing around with shading, things begin to appear more life like. This website has some great directions for getting you started. Today in class we'll watch this video as well. This drawing will be due at the end of class.

Names on Bins, and Color Wheel Mandala


Please share a bin with 2 other people. You'll need to tape a tag (with your names on it) to a bin this hour. This is where you'll keep your paintbrushes and other random things.

Write your name on your paintbrush set and your paint palette.

Cut out a circle-ish shape. Try to use as much of the paper as you can. Then use a ruler and lightly divide the cirle into 4 even sections. Next you'll divide each of those sections into 3 more sections. You should have 12 pieces of pie when you're done.

Grading Sheets and the Value Scale

Yesterday you designed a small tattoo to serve as your logo in this class. Today I could like you to enlarge your tattoo logo and re-draw and ink it on your class grading folder. Before you turn in your folder, I would like for you to look through it and get familiar with the assignments we'll be doing this semester.

Next. Get a Sheet of white paper. At the bottom of the paper make a 1 inch line and then divide that into 10 segments. The first segment will be white the next will be slightly gray, the next will be slightly more gray, and the last segment will be the darkest and most glossy black. All 10 segments need to be a different VALUE. Neatness counts. Keep this in your bin overnight.

Wednesday, September 7, 2011

1st day in art I

We'll be
looking at the syllabus,
talking about class fees ($30),
finalizing a seating chart,
and this.

Tuesday, September 6, 2011

Welcome Back!

Welcome Back to Irondale!

To do today:

1. Go over syllabus.
2. Assign seating charts.
3. Get to know each other game:
*get a notecard and DON'T put your name on it.
*write these 4 things on it
-favorite color
-favorite food
-best place to hang out
-this year I want to...
*I'll collect cards and pass them back out randomly.
*Interview people until you find out whose card you have. Write their name on the back and KEEP IT.
*Introduce your new friend to the class.
4. Start passing out supplies and putting them in your bins.

Leather Wrap Bracelets Evaluation

Evaluation for Leather-Wrap Bracelet

* The finished project can wrap around your wrist at least twice.
0 1 2 3 4 5 6 7 8 9 10
* The beads fit snugly between the leather cords without extra fishing line hanging.
0 1 2 3 4 5 6 7 8 9 10
* All knots are tied tightly and finished with a dot of clear polish.
0 1 2 3 4 5 6 7 8 9 10
* This piece feels like it will hold up well to lots of wear.
0 1 2 3 4 5 6 7 8 9 10
* Each bead wraps around the cord on both sides.
0 1 2 3 4 5 6 7 8 9 10
* The closure on this piece looks is neat and secure.
0 1 2 3 4 5 6 7 8 9 10

Leather Wrap Bracelets


Leather-Wrap Bracelet

Materials:
Round leather cord: we will use 1 yard of any color

Beading thread: we are basically using fishing line! I suggest taking about 4 feet at a time and then you’ll tie it off when you run out and tie on another 2 feet length.

Beads: for this assignment we’ll be using glass seed beads in a variety of colors. Make a pattern, or don’t, it’s up to you. If you try this again on your own, use whatever size and color you would like - just match them up in weight to the size of the lace you are using. You must be able to thread the beading thread twice through each bead. Wouldn’t it be cool to use nuts from the hardware store to give it a different look?

1. Double the cord and tie a knot with an opening that is bigger than a pencil eraser and smaller than a crayola marker. Now tie another knot next to it with the same sized opening. When a bead joins with one of these loops, it will make a closure for your bracelet.
2. Tie (double knot and pull tight ly with your teeth) the fishing line on the left side of the cord. (It doesn’t really matter which side, except that when you’re learning it’s easier if we all do it the same way)
3. Tape the top loop onto your table with your fishing line tied to the left side.
4. Bring the fishing line under the leather cord and add a bead. Slide the bead so it is snug against the cord. Loop the thread over the other leather cord and come back under it and back through the bead. You are making a figure 8 with the fishing line, with the line going through the bead twice in the middle.
5. Loop the thread over the first leather cord and add another bead, looping the thread and going back through the bead as before. Snug up each bead as you go, keeping the leather lace just enough apart to accommodate the beads.
6. Continue on until you reach the length you determined at the beginning. Tie (double knot)off the beading thread to one of the laces as you did in the beginning, but don’t cut it off.
7. DOUBLE DRILL your bead and slide it on both leather cords and the fishing line. Cut the fishing line short enough so that it is hidden inside the bead.
8. Tie a double knot (tighten with your teeth) and cut the remaining leather about ¼ inch long.
9. Put a TINY bit of clear fingernail polish on any knots that are visible.
10. Done! Evaluate your work and turn it in!

Thursday, September 1, 2011

Welcome 9th Graders!

Today we have shortened periods.
TO DO TODAY:

1. Today is the day to ask any questions about what to do and where to go on regular school days. Let's talk about that.

2. Get out your planner and write down my birthday. It's on January 13th. You won't have me in class then, but if you come back and say 'happy birthday,' I'll give you candy. Nice huh?

3. Get an index card and write these things on it:

a. favorite color:

b. favorite food:

c. best place to hang out:

d. this year I want to get involved in:

Don't write your name on this card. Just hand it to me. I'll shuffle these cards and hand them back out to you. You'll need to then question students in the room to find out whose card you have.

4. Introduce the person from your card. Make sure you pronounce their name correctly. If you don't remember how to say it, ASK.