Thursday, May 30, 2013

Day 2 Animated GIF

Day 2 Animated Gif

  • Find your work.psd document in your student folder.  Double click it.  
  • You should have 3 different layers in your layer stack:  Background (should be blank), A, and 1.
  • Right click on layer A and duplicate layer.  Keep it in this work document, and rename it B.  click Ok
  • Right click on layer 1 and duplicate layer.  Keep it in this work document, and rename it 2.  click Ok
  • You should have 5 different layers in your layer stack:  Background (should be blank), A, and 1, B and 2.
  • DO NOT DO ANYTHING TO EITHER LAYERS A OR 1
  • Layer B and layer 2 both need to be altered.  
  • Click on Layer B and go to edit.  Select PUPPET WARP.  When you click on something, it tacks everything down.  Tack down at least 5 spots.  Now, click and slightly drag one or two of your tacks to move it.  DON’T MOVE IT VERY FAR.  Click on the move tool (top tool) and it will ask if you want to apply.  click OK.  
  • Click on Layer 2 and go to edit.  Select PUPPET WARP.  When you click on something, it tacks everything down.  Tack down at least 5 spots.  Now, click and slightly drag one or two of your tacks to move it.  DON’T MOVE IT VERY FAR.  Click on the move tool (top tool) and it will ask if you want to apply.  click OK.
  • Right click on layer B and duplicate layer.  Keep it in this work document, and rename it C.  click Ok
  • Right click on layer 2 and duplicate layer.  Keep it in this work document, and rename it 3.  click Ok
  • You should now have 7 different layers in your layer stack:  Background (should be blank), A, and 1, B and 2 and C and 3.  
  • Click on Layer C and go to edit.  Select PUPPET WARP.  When you click on something, it tacks everything down.  Tack down at least 5 spots.  Now, click and slightly drag one or two of your tacks to move it.  DON’T MOVE IT VERY FAR.  Click on the move tool (top tool) and it will ask if you want to apply.  click OK.
  • Click on Layer 3 and go to edit.  Select PUPPET WARP.  When you click on something, it tacks everything down.  Tack down at least 5 spots.  Now, click and slightly drag one or two of your tacks to move it.  DON’T MOVE IT VERY FAR.  Click on the move tool (top tool) and it will ask if you want to apply.  click OK.
  • You can stop here if you’d like to... otherwise continue on with layers D and 4, E and 5, etc.  
Saving:
  • Make sure you’re in the work.yourname file and go to file, save as.  Click on My Computer, so you can see your student file with your number.  See me if you don’t see that number.  Double click your number.  Make sure you’re in format Photoshop (PSD) and hit save.
  • Make sure you’re in the final.yourname file and go to file, save as.  Click on My Computer, so you can see your student file with your number.  See me if you don’t see that number.  Double click your number.  Make sure you’re in format Photoshop (PSD) and hit save.
You’re done for the day!

Thursday, May 23, 2013

1st day animated GIFs

Now that you've completed 2 sheets of paper:  one with your main character and one with a full page background, you're going to start working on them in photoshop.

Day 1 on animated GIFs

Log onto your student server.  You must be logged in.  If you can’t, see me. 

  • Find your background and your character in the student shared folder, in the pick up box, cannonj, cartooning 2013.  Drag them both to the desktop. 
  • Double click on photoshop.
  • Go to file and click on new.  Name that file “work.yourname” and set the width to 540 pixels and the height to 640 pixels, and the resolution to 200.  Don’t change anything else.  Hit OK. 
  • Go to file and click on new.  Name that file “final.yourname” and set the width to 540 pixels and the height to 640 pixels, and the resolution to 200.  Don’t change anything else.  Hit OK.
  • Go to file and click on open.   Select your background 
  • Go to the layers (near channels and paths on the right) and right click, then select duplicate layer.  Rename it A and click on the drop down menu to select work.yourname.  Click Ok. 
  • Go to file and click on open.   Select your main image. 
  • Go to the layers (near channels and paths on the right) and right click, then select duplicate layer.  Rename it 1 and click on the drop down menu to select work.yourname.  Click Ok.
  • Scale 1(your main image) to fit your background by selecting the move tool. (The top tool that looks like a fancy plus sign) Hit control T  and then  hold shift as you drag your image so that it’s the right size for your background. 

Saving:
  • Make sure you’re in the work.yourname file and go to file, save as.  Click on My Computer, so you can see your student file with your number.  See me if you don’t see that number.  Double click your number.  Make sure you’re in format Photoshop (PSD) and hit save. 
  • Make sure you’re in the final.yourname file and go to file, save as.  Click on My Computer, so you can see your student file with your number.  See me if you don’t see that number.  Double click your number.  Make sure you’re in format Photoshop (PSD) and hit save. 

You’re done for the day. 


Tuesday, May 21, 2013

Animate your "Scribbles"


I'm so crazy for the work of Dain Fagerholm. There are many, many animated gifs online, and I think his hand-drawn look is really exciting to look at. Today I want you to take one of your characters and practice "scribble-shading" with a ballpoint pen. Please fill a full sheet of paper. Do not work on the background yet.

1.  Sketch out your character on a full sheet of paper with a pencil
2.  Start "scribbling" on your design.  The more scribbles in one area the darker it will be, the few scribbles the lighter it'll be.  Duh, huh?  


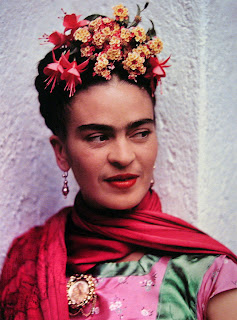
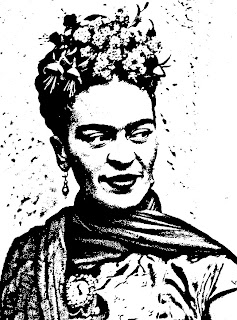
We're working on painting people we admire in Art I right now. Students found photos and then ran them through the program at phixr.com. Once the students have manipulated their picture, they trace it on a piece of watercolor paper. The rest of the tutorial is here. These are due on Thursday, May 23rd.

Here's a really cool video using many of the techniques used for this painting assignment!

Thursday, May 16, 2013

Flatting and coloring your character

You'll be using photoshop through Friday to color your character.  Here is the evaluation sheet for the assignment...

Character is carefully drawn and inked with a variety of widths.
0-10
There are 2 separate layers showing:  line art and colors
0-10
All coloring is done on the color layer and stays right on top of the black line.
0-10
Multiple values of color are used to show shades and highlights
0-10
An effort to be neat, thorough and creative shows in your work.
0-10
Work is turned in on time used time in class wisely.
0-10

Total==60 points

Phixr


Today you'll choose a photo of a person that you admire off of the internet.  It (of course) needs to be school appropriate.  You will alter it using phixr.com.  You need to be logged in to your student server in order to save your work in the drop box.  

To change your photo into a high contrast black and white photo:
www.phixr.com
·       Click on the green “get started” arrow
·       Click “no thanks, skip this
·       Click the gray “browse” button
·       Look in the desktop, click on your file and hit open
·       Click on  “upload the chosen photo to phixr
·       Click on the sharpen tool and then click the unsharp mask button
·       Click on the color effects tool, and on the pull-down click on “two color” and you can play around with the contrast and brightness until you get something that you like. (Mine were brightness=109 and contrast=7) then hit execute
·       Under the download/save tab pull down jpeg under the file format and hit download/save. 
·       Make sure save is selected on the pop-up and click OK
·       Save in the drop box under your hour:
>downloads
>student shared on Mvc1_student_server/stu
>Irondaledropbox
>cannonj
>your hour
>save


Our collaborative Brain...

Today we're working on a collaborative art project.  I'll provide the head and the brain opening and you'll provide the most interesting drawing/shape/design that you possibly can:  given just one hour, one pair of scissors, one post-it note, and one Sharpie marker.

Monday, May 6, 2013

printmaking


Before we start today, we're going to watch a couple of videos on  printmaking.

Inspired by the traditional Tibetan Prayer Flag, we will create a positive wishing flag, which will be carved,printed, and hung by the students.
Here are some traditional flags being flown. A common misconception is that these prayers are being sent to the gods. Instead they are positive wishes that are being shared with the community. We will also be creating positive messages to be shared in much the same way.

First, students will brainstorm ideas for images that communicate a positive wish for either themselves or the world. Students will design a central image for their own flag that represents their wish. Finally they will design a border or frame that surrounds the central image. Students can choose to use all images, but could also add text.

Students will transfer their drawings to linoleum and cut it out based on the safety instructions given in class.

Students will use the printing press to make multiple copies of their wishing flags. (The image that students carve will be reversed when it's printed)